|
IMPULSE TECHNIQUE FOR STRUCTURAL
FREQUENCY RESPONSE TESTING
By William G. Halvorsen, Anatrol
Corporation and David L. Brown, University of Cincinnati
Reprinted from Sound and Vibration November,
1977
Structural frequency response testing,
also known as "modal analysis," is becoming an integral part of the
development and testing of a wide range of industrial and consumer
products. It is an essential tool for the definition and solution of
many types of structural dynamics problems, such as fatigue,
vibration, and noise. This article discusses one of the most useful
techniques for experimental structural frequency response
testing-one based upon excitation of the structure with an impulsive
force. In many situations, this is the simplest and fastest of the
various techniques commonly used today. However, the nature of the
excitation and response signals in the impulse technique requires
special signal processing techniques if accurate frequency response
measurements are to be obtained. This article discusses the
application of the impulse technique and reviews the special
problems encountered in practice and the techniques that have been
developed for dealing with those problems.
Knowledge of the dynamic
characteristics of structural elements often means the difference
between success and failure in the solution of complex noise and
vibration problems. The effects of structural resonances-conditions
of relatively low dynamic stiffness-can lead to seriously reduced
effectiveness of isolation elements and result in significantly
increased dynamic response of sound radiating or vibration exposure
elements. Quantitative knowledge of the frequencies, damping, and
mode shapes associated with structural resonances aids in
understanding how forces are generated and transmitted throughout
mechanical systems and allows intelligent evaluation of various
noise and vibration control modifications and treatments. The
determination of the resonance characteristics of structures is
termed "modal analysis." The purpose of this paper is to review in
detail one particularly useful technique for experimental modal
analysis, a technique employing the application of an impulsive
force to the structure.
In two previous papers, the theory of
modal analysis was reviewed and a number of techniques for
experimental modal analysis were discussed, including sweptsine
excitation, purerandom excitation, pseudorandom
excitation, periodicrandom excitation, and various forms of
transient excitation.12 The impulse technique falls into the class
of transient excitation. It deserves particular attention because,
for a wide range of structures, it is the simplest and fastest
technique for obtaining good estimates of the required frequency
response information. There are, however, a number of errors that
can occur in the application of the impulse technique and there are
certain types of struc for which the impulse technique is
illsuited. The major errors encountered in the application of
the impulse technique will be discussed along with the signal
processing and experimental techniques applicable to impulse
testing.
Theory
Frequency Response Function. The
measurement of the frequency response function is the heart of modal
analysis. The frequency response function H(f) is defined in terms
of the single input/single output system, shown in Figure 1, as the
ratio of the Fourier transforms of the system output or response
v(t) to the system input or excitation u(t), Equation 1

Where V(f) = Fourier transform of
system output v(t)
U(f) = Fourier transform of system input
u(t).
The only requirements for a complete
description of the frequency response function are that the input
and output signals be Fourier transformable, a condition that is met
by all physically realizable systems, and that the input signal be
nonzero at all frequencies of interest. If the system is
nonlinear or timevariant, the frequency response function will
not be unique, but will be a function of the amplitude of the input
signal in the case of a nonlinear system and a function of time in
the case of a system with timevarying properties.
The frequency response function may be
computed directly from the definition as the ratio of the Fourier
transforms of the output and input signals. However, better results
are obtained in practice by computing the frequency response
function as the ratio of the crossspectmm be the input and
output to the power spectrum of the input, Equation 2. This
relationship is derived by multiplying the numerator and denominator
of the righthand side of Equation 1 by the complex conjugate of
the input Fourier transform.

The usefulness of this form of the
frequency response function can be seen by considering the practical
single input / single output measurement situation illustrated in
Figure 2, where m(t) and n(t) represent noise at the input and
output measurement points respectively.
The measured frequency response
function H'(f) is given by the expression:

where the upper case letters denote
the Fourier transform of the corresponding time domain
signals.
In this form, the measured frequency
response will be a good approximation of the true frequency response
only if the measurement noise at both the input and output
measurement points is small relative to the input and output
signals. Multiplying the numerator and denominator of the
righthand side of Equation 3 by the complex conjugate of X(f)
yields
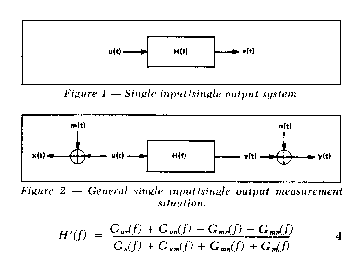
Now, if the measurement signals
signals and and are noncoherent with each other and with the input
signal u(t), then the expected value of the crossspectrum terms
involving m and n in Equation 4 will equal zero, yielding

where H(f)is the desired true frequency response function.
Thus, if the noisetosignal ratio at the input
measurement point [Gm(f)/ Guf)] is much less
than 1, the measured frequency response will closely approximate the
desired true frequency response function.
It should be pointed out here that
there is an inherent bias error associated with the computation of
the cross-spectrum and the magnitude of this bias error is inversely
proportional to the number of averages in the computation. Thus, the
greater the measurement noise, the greater the number of averages
required to approach the expected value of the crossspectrum
between the input and the output measurement signals. With
measurement technigues employing many averages, the bias error can
usually be reduced to an insignificant level so that it is only
necessary to minimize the noise in the measurement of the input
signal. However, if there is significant measurement noise and only
a few averages are used, then the computed values of the
crossspectrum terms involving the noise signals in Equation 4
can be large relative to the true cross-spectrum, with resulting
large errors in the measured frequency response function. In
general, only a few averages are used in the impulse technique;
otherwise, one of its major advantages - its speed - is lost.
Therefore, it is important to minimize measurement noise in both the
input and output signals when using the impulse technique. The
crossspectrum bias error and its effects are discussed in more
detail in Reference 3.
Coherence Function. There is another
important reason for computing the frequency response function in
terms of the crossspectrum: it allows the computation of the
coherence function between the input anti output signals. The
coherence function is defined by the equation

According to the definitions of the power spectrum and the
crossspectrum, the coherence function will he identically equal
to 1 if there is no measurement noise and the system is linear. The
minimum value of the coherence function, which occurs when the two
signals are totally uncorrelated, is 0. Thus, the coherence function
is a measure of the contamination of the two signals in terms of
noise and nonlinear effects, with very low contamination indicated
for values close to 1.
Since the crossspectrum is
included in the definition of the coherence function, the
crossspectrum bias error must be reduced to an acceptable level
if a good statistical estimate of the coherence function is to be
achieved. As stated above, the number of averages used in the
impulse technique is usually not great enough to significantly
reduce the bias error. However, the coherence function is still
useful for indicating the importance of noise in the impulse
technique. This is because noise in the signals causes variance in
the value of the coherence function with frequency. This effect is
illustrated in the section on measurement procedures.
Display of Frequency Response. The frequency response function is
complex - that is, it has associated with it both magnitude and
phase. Therefore, it can be displayed in a number of forms,
including magnitude and phase versus frequency, real and imaginary
magnitudes versus frequency, and imaginary magnitude versus real
magnitude. Each of these types of displays has its own particular
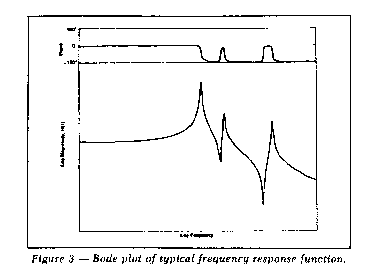
usefulness. The most common type of display for structural frequency
response data is magnitude and phase versus frequency, with the
magnitude and frequency plotted logarithmically. This type of
display, with the magnitude in terms of compliance (ratio of
displacement to force), is called a Bode plot. In this form of the
frequency response function, resonances occur as peaks in compliance
plots (points of maximum dynamic weakness) and all resonance peaks
of equal damping have the same width regardless of resonance
frequency. Lines of constant dynamic stiffness have zero slope, and
massdominated frequency response lines have a 12
dBperoctave slope. Figure 3 shows an example of a Bode
plot of a measured frequency response function.
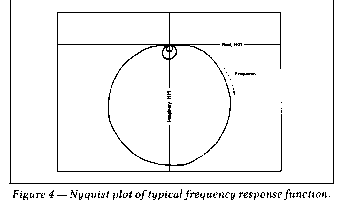
Resonances occur as nearly circular arcs in the complex plane
(real versus imaginary plot) with frequency increasing in a
clockwise direction around the arc. In the case of real normal modes
(which occur in systems with relatively low damping and with
resonances wellseparated in frequency), each resonance arc is
approximately tangent with and lies below, the real axis and is
symmetric about the imaginary axis when the frequency response is
expressed as compliance. The complex plane plot is useful when
certain types of analytical curve fitting operations are being
performed on the frequency response data. Figure 4 shows the complex
plane plot of the frequency response function shown in Figure 3.
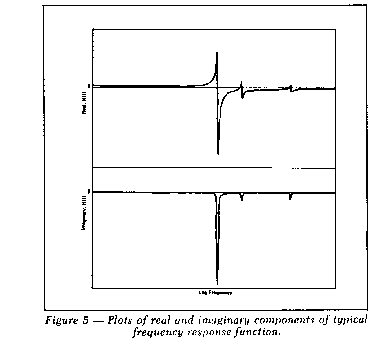
The plots of the real and imaginary magnitudes of frequency
response versus frequency are most useful when dealing with real
normal modes. In this case the resonances will occur as peaks in the
imaginary magnitude plot and the real magnitude will pass through
zero at the resonance frequency when the frequency response is
expressed as compliance. Figure 5 shows the real and imaginary plots
for the data in Figure 3.
The frequency response characteristics of a structural element
are determined by measuring a set of cross-frequency response
functions as discussed in Reference 1. The crossfrequency
response functions may be obtained by exciting at one location on
the structure and measuring response at various locations, or by
measuring the response
at a single location to excitation at
various locations. The resulting frequency response functions
comprise one column of the transfer matrix in the first case, and
one row of the transfer matrix in the second case. Either set will,
in general, completely define the modal characteristics ofthe
structural element. In mathematical terms the set of frequency
response functions yields the eigenvalues and eigenvectors, which
are, in general, complex terms. The real part of an eigenvalue is
the damping and the imaginary part is the frequency associated with
a given resonance. Each eigenvector defines a resonance mode shape.
With real normal modes, each point on a structure is either
exactly inphase or exactly 180 degrees outofphase
with any other point at the resonance frequency. Certain types of
damping which are often encountered in practice will cause the
eigenvectors to have nonzero imaginary components, resulting in
complex mode shapes. When a mode is complex, the relative phase
associated with a point on a structure is some value other than O or
180 degrees, with the result that node lines (lines of zero
deflection) are not stationary. Precise description of complex modes
requires that some type of analytical curve fitting technique be
applied to the frequency response data.
Measurement of Frequency Response. The frequency response
function of an operating system can be computed if the system input
and output signals meet previously stated requirements of Fourier
transformability and non-zero value, assuming the system input and
response can be measured. However, in practice there are usually
multiple inputs to the system - either several inputs at different
locations or inputs in more than one direction at a given location.
In the case of multiple coherent inputs, the complexity of the
analysis is greatly increased. For this reason, and the difficulty
of accurately monitoring operating inputs, frequency response
measurements are usually made by applying the system input
"artificially" through some type of exciter. It is in the form of
the input signal and the way it is applied to the structure that the
wide variety of frequency response testing techniques arises.
The usefulness of the impulse technique lies in the fact that the
energy in an impulse is distributed continuously in the frequency
domain rather than occurring at discrete spectral lines as in the
case of periodic signals. Thus, an impulse force will excite all
resonances within its useful frequency range. The extent of the
useful frequency range of an impulse is a function of the shape of
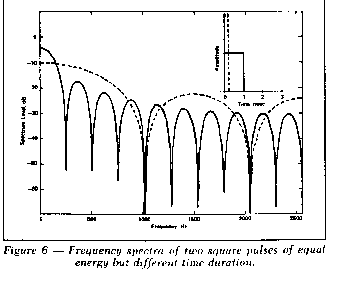
the impulse and its time duration. Figure 6 shows the frequency
spectra of two square pulses of equal energy but different duration.
For a square pulse the frequencies of the zero crossings are at
integral multiples of the inverse of the time duration of the
impulse, illustrating the very important inverse relationship
between the time duration of an impulse and its frequency content.
The useful frequency range of an impulse is also a function of
the shape of the impulse. Figure 7 shows three
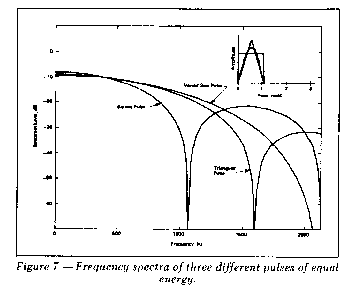
different pulses of equal energy and
time duration and their corresponding frequency spectra. By varying
the weight and hardness of an impacting device and the manner in
which the impact is applied, the shape and time duration of the
impulse produced can be varied to suit the measurement requirements.
Such practical will be further discussed in the section on
experimental measurement techniques.
Nonlinearities in Structures
Excitation of a nonlinear system by a purerandom signal will
yield the best estimate (in a meansquare sense) of the linear
system response. Excitation by a pure sine wave is also useful for
studying nonlinear systems because it allows precise control ofthe
input spectrum level. However, the impulse technique, because of its
very high ratio of peak level to total energy, is particularly
illsuited for testing nonlinear systems. Therefore, it is
important to understand the various types of nonlinearities that can
occur in structural systems and to be able to recognize
nonlinearities in measured frequency response functions.
One of the most common types of nonlinearities encountered in
structures is that due to clearance between parts. This type of
nonlinearity is frequently encountered, for example, when testing
gear systems and shafts mounted in bearings. The effects of this
type of nonlinearity on measured frequency response functions when
using impulse excitation are poor estimates of static stiffness
values and poor repeatability of the frequency response estimates.
Also, the apparent damping in the estimates will be greater than the
actual examples.
The best method of dealing with this type of nonlinearity is to
preload the system to take up clearances. Care must be taken when
this is done, however, because any preload will change the boundary
conditions of the structure and can itself lead to erroneous
frequency response estimates. The usual approach is to apply the
preload through a very soft spring so that the resonances associated
with the preload lie below the frequency range of interest.
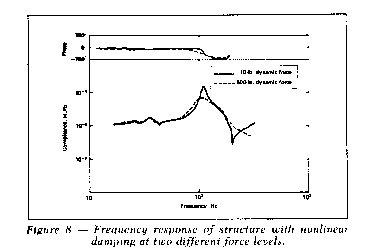
Another type of nonlinearity that is frequently encountered is
nonlinear damping. Nonlinear damping effects are usually associated
with joints in the structure, where the damping is a function of the
relative displacement at the joint. In general, the frequency
response estimates obtained by the impulse technique will agree most
closely with those obtained with a low level of continuous
excitation. However, if the point of excitation is close to a
location where nonlinear damping occurs, there will be high relative
motion at that location, and the apparent damping in the measured
frequency response will be high. In systems with low damping, this
will give the measured frequency response a discontinuous
appearance, due to the varying level of damping as the response to
the impulse attenuates with time. This type of nonlinearity is
illustrated in Figure 8, which shows frequency response measurements
on a machine tool with different force excitation levels. The
frequency response measurements were made with sweptsine
excitation.
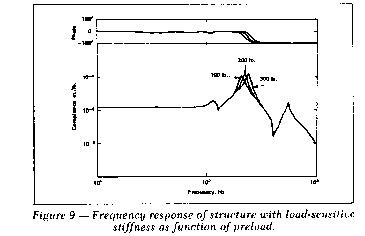
The third type of nonlinearity that commonly occurs in structures
is loadsensitive stiffness, where the spring rate of elastic
elements either increases or decreases with load. The most direct
way to identify this type of nonlinearity is to measure frequency
response as a function of static preload and observe the change in
resonance frequencies. This type of nonlinearity is illustrated in
Figure 9, which shows frequency response measurements on a pump with
three different levels of preload.
Signal Processing
The particular characteristics of an impulsive force signal and
the resulting structural response signal make the impulse technique
especially susceptible to two problems: noise and truncation errors.
While these problems occur to some extent with other frequency
response testing techniques, their unique importance in the impulse
technique requires special signal processing methods.
Force Signal. It was pointed out in the previous section that the
usable frequency range for an impulse depends on the shape and time
duration of the impulse. In order to insure that there is sufficient
force over the frequency range of interest, it is necessary that the
first zero crossing of the Fourier transform of the impulse be well
above the maximum frequency of interest. For a given time duration
the first zero crossing occurs at the lowest frequency for a square
pulse. For that type of pulse the first zero crossing occurs at a
frequency equal to the inverse of the time duration. A good rule of
thumb, then, is to insure that the duration of the impulse is less
than 2(delta)t, where (delta)t is the sampling interval in the
analogtodigital conversion process. This would put the
first zero crossing of the Fourier transform of a square pulse at
the Nyquist folding frequency, and the first zero crossing of other
pulse shapes above the Nyquist folding frequency.
The sample length is equal to N(delta)t where N is the number of
digital values in each sample. A typical value of N is 1024. Thus,
the duration of the impulse is very short relative to the sample
length. This means that the total energy of noise represented in the
timesample can be on the order of the energy of the impulse,
even for high signaltonoise ratios. The noise problem is
further aggravated when employing the zoom transform, which yields
increased resolution in a given frequency band by effectively
increasing the sample length.
With other techniques, the effects of noise are reduced by
averaging the power spectrum and crossspectrum functions prior
to the computation of the frequency response function. However, only
a few averages are usually used in the impulse technique. Otherwise,
the time advantage of the technique is lost. Therefore, special
timesample windows have been developed for the impulse
technique.
At first thought it might seem appropriate to just set all
timesample values beyond the impulse to zero, since it
is
known that the true signal value after
the impulse is zero. However, this would be equivalent to
multiplying the signal by a narrow rectangular window. In applying
any type of window, it is important to keep in mind that
multiplication; by a window in one domain is equivalent to
convolution of the Fourier transforms of the window and the data in
the other domain, resulting in distortion of the transformed signal.
This distortion will be minimized by minimizing the width of the
main lobe of the window transform and suppressing its side lobes.
However, there is a fundamental conflict between these requirements
and the reduction of noise in the timesample because both the
width of the main lobe and the amount of noise reduction are
inversely proportional to the width of the window in the time
domain. To further complicate the situation, suppression of the side
lobes is generally achieved at the expense of broadening the main
lobe.
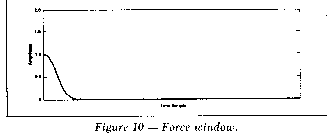
A good compromise has been arrived at in practice the form of a
window with unity amplitude for the duration of the impulse and a
cosine taper, with a duration of 1/16 of the sample time, from unity
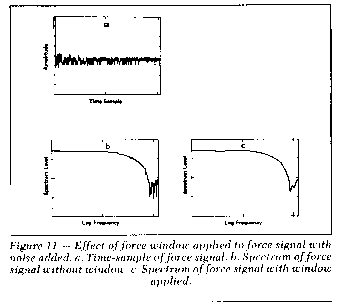
to zero. This window is shown in Figure 10. Figure 11 shows the
results of applying the force window to an impulse signal with
significant measurement noise. Comparison of the computed frequency
response functions with and without the window applied shows that
the window substantially improves the frequency response estimate.
Response Signal. Noise problems may also be encountered in the
response signal, particularly when dealing with heavily damped
systems and when using zoom transform analysis. In both cases the
duration of tile response signal may be short relative to the total
sample time, so that noise may comprise a significant portion ofthe
total energy in the timesample even with relatively high
signaltonoise ratios. Another error in the response signal
that is encountered when testing lightly damped structures occurs
when the response signal does not significantly decay in the sample
window. In this case the resulting timesample is equivalent to
multiplying the true response signal by a rectangular window, with
the result that the frequency resolution may not be sufficient to
resolve individual resonances.
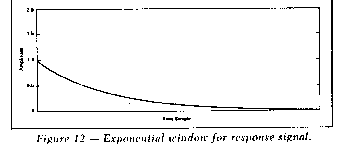
An exponential window has been developed to reduce the errors
that occur in both situations described above. The window shape is
shown in Figure 12. The window decays exponentially from 1 to a
value of 0.05 in the sample time. It can be applied directly to the
timesample of the response signal or to the impulse response
function. As with all windows, the exponential window does change
the resulting measured frequency response function; but its only
effect is to increase the apparent damping in the resonances. It
does not change the resonance frequencies and, because the effect of
the exponential window is the same on all frequency response
measurements, it will not alter the measured mode shapes if applied
to all measured frequency response functions. In addition to
reducing
noise and truncation errors, the
exponential window will also reduce errors often occur when testing
lightly damped systems in which the damping varies with the
measurement position on the structure.
Because the exponential window increases the apparent damping in
the resonance modes, there is a tendency ofthe window to couple
closely spaced resonance modes. Zoom transform analysis may be
required in some cases to allow sufficient resolution of closely
spaced modes when using the exponential window.
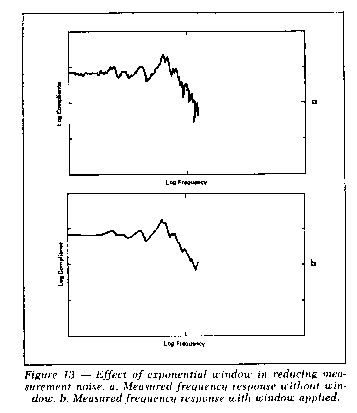
The use of the exponential window for reducing noise effects in
the response signal is illustrated in Figure 13. In this case the
structure is fairly heavily damped, so that the response signal
decays substantially in the first part of the timesample. It is
seen that the application of the window provides a very noticeable
smoothing effect on the measured frequency response function. Notice
also that the window has not changed the resonance frequencies.
Zoom Transform. Zoom transform analysis is discussed in some
detail along with several examples in Reference 2. It is a very
valuable tool in impluse testing, as it is in other frequency
response measurement techniques. The effect of the zoom transform is
to increase the resolution of the analysis by allowing independent
selection of the upper and lower frequency limits of the analysis
band. With the zoom transform, for example, it is possible to
perform an analysis in the frequency range from 900 to 1000 Hz as
opposed to the conresponding baseband range of 0 to 1000 Hz,
resulting in a 10to1 increase in resolution, for a given
sample size N, in the 900 to 1000 Hz band. Because of the greatly
increased resolution possible with the zoom transform, it can he
effectively used in frequency response testing to separate closely
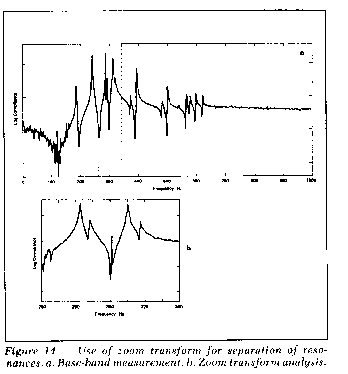
spaced resonance modes. This is illustrated in Figure 14, which
shows a baseband frequency response measurment from 0 to 1000
Hz and a zoom transform analysis of the frequency response in the
range from 260 to 340 Hz.
There are two important effects of the zoom transform
in
the impulse technique, both associated
with the resulting increase in sample time. The first effect is to
make possible much better estimates of damping in lightly damped
systems. This is due to the reduction of truncation errors in the
sampled response signal. The second effect, mentioned previously, is
aggravation of the noise problem in both the input and response
signals. The second effect makes it essential that force and
response windows be applied to the data in most cases when using the
zoom transform with the impulse technique.
Curve Fitting. Cases of extreme measurement noise require special
signal processing techniques beyond the application of sample
windows. One technique that has been found to be very useful in
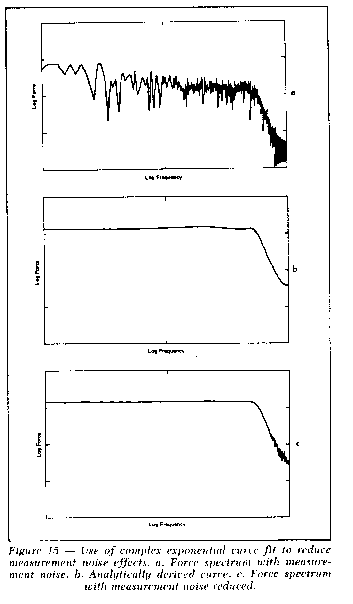
practice is to analytically curve fit the data. Figure 15
illustrates the application of a complex exponential algorithm to a
force signal with a signal to-noise ratio of 1. (The complex
exponential algorithm is discussed in some detail in Reference 4.)
Figure 15a shows the spectrum of the measured force signal and
Figure 15b shows the analytically derived spectrum fitted to the
data with five degrees of freedom. The quality of the fit is seen in
comparing the analytical curve with the spectrum of the force signal
with the measurement noise reduced, shown in Figure 15c.
Equipment Requirements
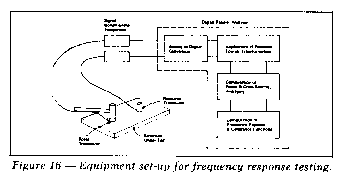
The measurement set up for the impulse
technique is shown schematically in Figure 16. The force is applied
to the structure by an impactor through a load cell and the response
is measured by a suitable response transducer. After passing the
force and response signals through signal conditioning equipment,
including appropriate amplifiers and antialias filters, the
signals are digitized. The digitized signals are then Fourier
transformed, the appropriate sample windows are applied, and the
crossspectrum and the two power spectra are computed and
averaged. Finally, the frequency response and coherence functions
are computed from the averaged power and crossspectra.
The particular characteristics of each element of the test set up
are described below. In addition to their individual
characteristics, it is especially important that all elements be
linear and have low noise when used in the impulse technique.
Impactors. The characteristics of the impactor determine the
magnitude and duration of the force pulse which, in turn, determine
the magnitude and content of the pulse in the frequency domain. The
two impactor characteristics of most importance are its weight and
tip hardness. The frequency content of the force is inversely
proportional to the weight of the impactor and directly proportional
to the hardness of the tip. Since the weight also determines the
magnitude of the force pulse, the impactor is usually chosen for its
weight and then the tip hardness is varied to achieve the desired
pulse time duration. The weight of impactors commonly used in
practice varies from fractions of an ounce, for ball bearings used
for very high frequency testing of small structural elements such as
turbine blades, to hundreds of pounds for impactors used in testing
large structures. In any given measurement situation there is a
limit to the weight of the impactor beyond which multiple impacts
cannot be avoided. This limit is a function of the inertia of the
impactor and the response of the structure.
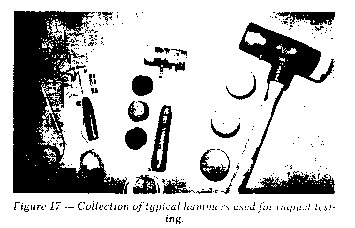
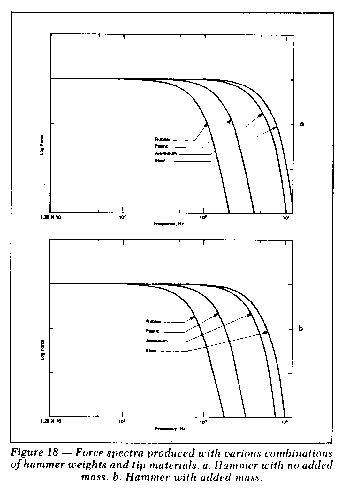
In most cases the impactor is in the shape of a hammer and the
impacting is done by hand. Figure 17 shows a collection of impact
hammers and tips that are applicable to a wide range of structures.
Figures 18a and 18b show the
frequency spectra of the force impulse
produced with a hammer with different tips and with mass added to
the hammer.
The magnitude and time duration of the force pulse depend on the
dynamic characteristics of the structure at the impact location as
well as the hammer characteristics. For example it may be impossible
to excite a weak structure such as thin sheetmetal with a
sufficiently short duration impulse and still maintain the desired
force magnitude using an impactor. The manner in which the impactor
is applied to the structure also affects the magnitude and width of
the pulse. It is important that there be moderate consistency in the
impact from one sample to the next to insure that the proper
frequency content of the force pulse is maintained and that the
maximum signaltonoise ratio is achieved without
instrumentation overload.
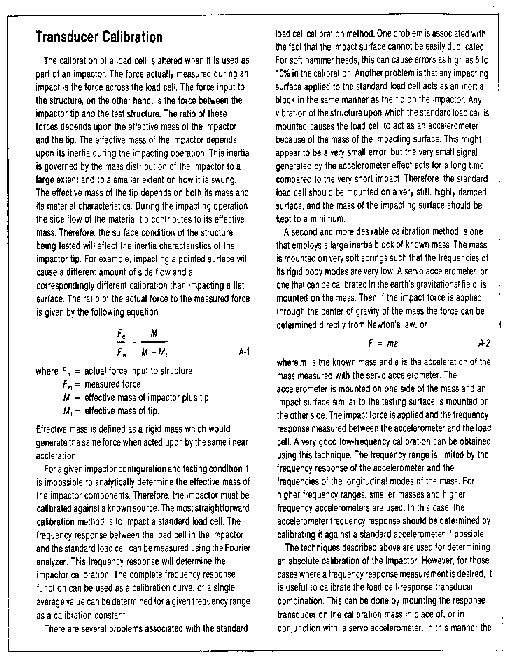
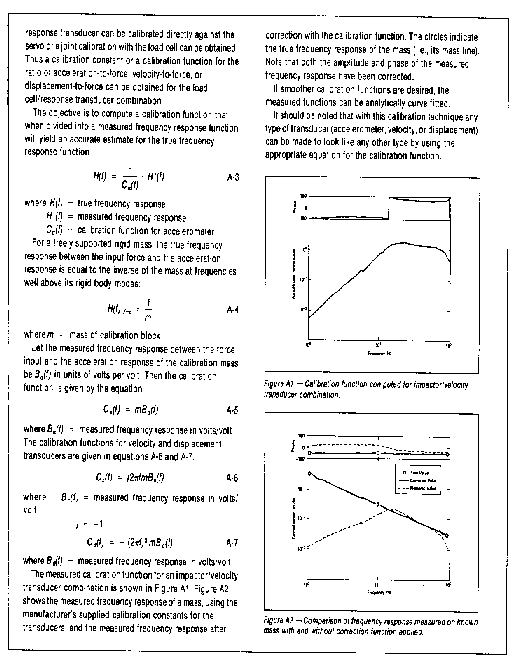
Measurement Transducers. At least two transducers are required to
obtain calibrated frequency response measurements: a force
transducer and a response transducer. Triaxial measurements, of
course, require three response transducers. The force transducer may
either be part of the impactor or be mounted directly onto the
structure under test. If the force transducer is mounted on the
structure, then its massloading effects on the structure must
be accounted for. If it is mounted on the impactor, then it is
necessary to calibrate the impactor/transducer combination because
the actual sensitivity of the transducer on the impactor can vary
from its independent sensitivity by as much as 30% due to the
impactor tip characteristics. Calibration of impactors is discussed
in detail in the Appendix. The response transducers used in impact
testing are usually accelerometers, but any suitable response
transducer may be used. Displacement probes and microphones are
sometimes used when transducer contact with the structure is
undersirable.
Signal Conditioning Equipment. The signal condition equipment
consists of the appropriate transducer amplifiers and the
lowpass filters required to prevent aliasing errors. Linearity
of this equipment is important because of the nature of the force
and response signals, but the two characteristics of special
importance in impact testing are their signaltonoise
ratios and their response to overloads. The importance of low
measurement noise has already been discussed. The response to
overloads is important because it is desirable to have the amplitude
of the force and response signals as high as possible relative to
the input range of the equipment in order to minimize noise, and
variations in the impacting can frequently cause overloading. It is
essential, therefore, that overloads be recognizable in the output
signals. Some charge amplifiers have multiple amplifier stages with
characteristics such that if the input stage is overloaded the
succeeding stages give the signal a nearly normal, unclipped
appearance, making it very difficult to detect overloads. This can
lead to very poor estimates of frequency response.
Antialias filters can also disguise overloads. For this
reason it is good practice to bypass the filters and examine
the signals for overloads with the analyzer set on its maximum
frequency range when preparing for a test.
Analysis System. The analyzer consists of
analogtodigital converters and a system for performing a
discrete finite Fourier transformation and the subsequent averaging
and data manipulation required to compute the frequency response and
coherence functions. The dynamic range of the
analogtodigital converters is determined by the number of
bits in the digital code used in the conversion process. Most
converters in common use have sufficient dynamic range for the
impulse technique, but it is important that the input range of the
converter be properly set for the force and response signals in
order to keep the digitizer noise to a minimum.
There are several types of analysis
systems being used today for frequency response testing. One type of
system utilizes time sharing access to a large central computer to
perform part or all of the Fourier transformation and data
manipulation tasks. Other types of analyzers perform all Fourier
transformation and data manipulation on site, either in a
hardwired system or a dedicated minicomputer. Any of these
various types of systems can be used in the impulse technique The
speed and accuracy of the analysis depends on the particular
characteristics of'the system. For general use in impact testing it
is very desirable that the system have zoom transform capability and
be able to apply the appropriate sample windows to the data. It is
also desirable that the analyzer have analytical curve fitting
capability in order to handle data with high measurement noise and
assist in extracting modal parameters from measured data
Measurement Procedures
Equipment Calibration and Set Up. The first step is to assemble
the proper signal conditioning and analysis equipment as discussed
above. Next, the impactor and the force and response transducers are
selected. Then, with the antialias filters bypassed and
the analyzer set at a high enough frequency range to avoid aliasing
errors, the mass and tip hardness of the impactor are varied to give
the desired magnitude and duration of the force pulse at all test
locations on the structure. The impactor is then calibrated using
procedures outlined in a subsequent section. Next, the input ranges
of all signal conditioning and analysis equipment are set to achieve
the maximum signaltonoise ratio without overloading.
Frequency Response Testing. The first step in the testing program
is to make frequency response measurments at a number of locations
on the structure so that the important resonances can be identified.
It may be desirable to make estimates of modal damping values at
this time in addition to determining the important resonance
frequencies. Analytical curve fitting routines are sometimes helpful
for these tasks.
The next step is to determine the location or locations to be
used for the stationary transducer during the mode
shape analyses. locations can be
determined from the initial frequency response measurements. In
impact testing, the response transducer is usually the stationary
one and the impact is applied at suitable locations on the structure
to define the resonance mode shapes.
It is good practice to monitor the force signal throughout the
test program to reject poor measurements. One problem to look for,
of course, is signal overload. Another cause for rejection is
multiple impacts within a data sample. Multiple impacts sometimes
occur, for example, when testing when lightly damped structures that
bounce back against the impactor before it can be drawn away after
the initial impact. Multiple impacts should be avoided because the
resulting frequency spectrum will have zeros due to the periodic
nature of the signal. In other words, very low levels of force will
occur at certain frequencies, with resulting poor
signaltonoise ratio at those frequencies. Further errors
are introduced when sample windows are applied to multiple impact
data because the windows as a singleimpulse form.
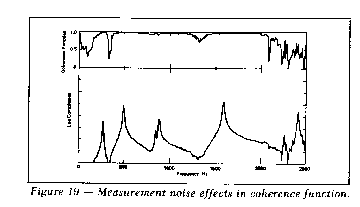
The coherence function is also helpful in monitoring the quality
of the frequency response measurements. It was pointed out
previously that the number of averages used in the impulse technique
was not sufficient in most cases to significantly reduce the
crossspectrum bias error. However, noncoherent noise in the
measured signals will increase the variance of the coherence
function, giving it a "noisy" appearance. This effect is illustrated
in Figure 19, where the noise effects are apparent in the coherence
funcin the vicinity of the antiresonance frequencies. This is
due to the low level of the response signal at the anti-resonances
and the correspondingly reduced signaltonoise ratio.
For each frequency response measurement the appropriate signal
processing techniques are used to reduce the effects of noise and to
achieve the desired frequency resolution. For mode shape analysis
some type of curve fitting may be required in some cases to extract
the modal coefficients. Common practice with the impulse technique,
however, is to use the quadrature (imaginary) component of the
frequency response to compute the mode shapes. as this gives
satisfactory results in most cases.
Examples
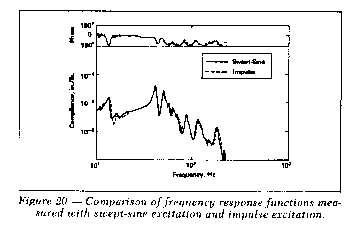
Example No. 1. This example compares the results of frequency
response measurements made with the impulse technique and the more
traditional sweptsine technique. The measurements were made on
a milling machine to determine the frequency response between the
workpiece and the cutting tool. For the impact tests the force was
applied to the workpiece and the relative response between the
workpiece and the cutting tool was measured. The analysis was
performed using a digital Fourier analyzer. For the sweptsine
tests a hydraulic exciter was used to apply a force between the tool
and the workpiece and the absolute motion of the workpiece was
measured. This analysis was performed on an analog transfer function
analyzer. The resulting frequency response measurements are shown in
Figure 20, and it is seen that there is very good agreement between
the results produced with the two methods.
The frequency response measurement using the impulse technique
was based on only one impact, and the impact and analysis took only
about two seconds to complete. This compares to a minimum often
minutes required to perform the sweptsine analysis. Additional
time savings were realized in the test set up. For the impact test
no fixturing or elaborate exciter system was required. It was,
however, necessary to insure that all backlash had been taken up in
the milling machine. This was achieved by impacting the machine
several times before making the measurement impact.
Example No. 2. The impulse technique can often be used to measure
the frequency response of an operating system. This is usually not
possible with other techniques because of the transducer and exciter
fixturing that must be attached to the structure. This example
discusses the application of the impulse technique to the frequency
response analysis of a grinder.
An aluminum disc was manufactured and installed to
simulate the grinding wheel. The
problem of applying a purely radial impact to the rotating wheel was
solved by suspending a light teflon flap such that it rode on the
periphery of the aluminum disc. When the disc was impacted, the
radial impulse was transferred to the disc while the teflon flap
prevented any tangential component from being transmitted to the
rotating disc. A displacement probe was mounted on the
nonrotating workpiece to measure the relative motion between
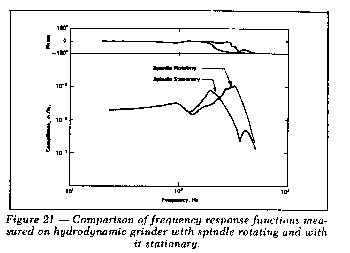
the grinding wheel and the workpiece. The frequency response was
measured for the grinder both with the spindle rotating and with it
stationary. The resulting frequency response measurements are shown
in Figure 21. This figure clearly shows the effect of the
hydrodynamic spindle on the system response.
Summary
The impulse technique is generally the fastest and easiest method
of exciting a structure for frequency response testing. In some
cases it is the only practical method of exciting a structure.
However, the particular characteristics of the resulting force and
response signals often lead to serious noise and signal truncation
problems that require special signal processing techniques to
overcome. Also, the impulse technique is illsuited for
frequency response testing of highly nonlinear structures and
certain other types of structures.
The major use of the impulse technique is in problems where
moderately accurate estimates of modal parameters and mode shapes
will suffice. This includes a wide range of structural dynamics
problems involving fatigue failures, vibration, and noise. It
generally does not produce results of sufficient accuracy for use in
developing system simulation models.
As people involved in structural frequency response testing
develop confidence in applying the impulse technique, it is expected
to become the most widely used excitation technique.
References
1. Ramsey, K.A., "Effective Measurements for Structural Dynamics
Testing - Part I," Sound and Vibration, Vol 9, No. 11, 1975
2. Ramsey, K.A., "Effective Measurements for Structural Dynamics
Testing - Part II," Sound and Vibration, Vol 10, No. 4, 1976
3. Halvorsen, W.G., and Bendat, J.S., "Noise Source
Identification Using Coherent Output Power Spectra," Sound and
Vibration, Vol. 9, No. 8, 1975
4. Brown, D.L., "Grinding Dynamics," Ph.D. Thesis, University of
Cincinnati, 1976. |